Introduction:
The Atmel Atmega 1284 is a good and cheap upgrade from the Arduino Uno, if you already have one.
The 1284 comes with 128Kb of Flash Memory, 16K of RAM for storing data, 2 UART ports, 32 Digital ports, 8 Analog with a 12 Bit resolution ADC ( 0-1023). Now the 328 found on the Uno has 32Kb of Flash, 2K ram, 1 UART, 23 Digital pins, 6 analog with a 8 Bit resolution ADC (0-255).
Now that we know we want to use the 1284, you can either use the Atmel Studio and stay away from Arduino, or use the Bootloader and this way you can upload the Arduino codes you already have without any major overhaul, you might need to change pin numbers or similar!
Before I begin, I would like to thank the person behind Maniacbug, he created the Bootloader required for the 1284, however his tutorial is aimed towards the pico power version of the 1284, and this blog is aimed towards the non P version, which requires some tweaks in order to get running!
Connection:
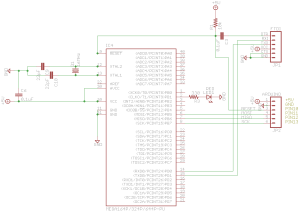
Go ahead and connect the 1284/1284p as seen in the following picture.
Burning Bootloader:
To be able to upload Arduino sketches to the 1284, we need to burn the Arduino Bootloader on to it, to do that, you need an Arduino Uno Board.
To turn an Uno into an ISP;
1- Open Arduino IDE
2- In Examples, find ArduinoISP and click on it, it will open as a new sketch.
3- Go to Tools, Board, and select Uno if it isn’t selected already.
4- Upload sketch!
Now we have to add the 1284 Chip to arduino Board Library.
1- Download the Zip File
2- Make a folder called “hardware” in your Arduino folder (the one that has your sketches) and unzip this file in there, you should have the following : /Arduino/hardware/mighty-1284p
3- If Arduino IDE is open, close and reopen for the files to take effect.
4- Select Tools > Boards > Mighty 1284p 16MHz Using Optiboot
5- Select Tools > Programmer > Arduino as ISP
If you have the 1284p version, then simply connect your Arduino Uno as indicated in the wiring diagram, make sure you have a 0.1 uF capacitor between reset and GND on the Uno, this will prevent the Uno from reseting while you burn the bootloader. It can take up to a minute or so for the IDE to burn the bootloader, while it’s working, you will see that the Rx, Tx, and L LEDs flash. When it’s done, you can disconnect the Uno and put it away, we will not be needing it anymore!
You can check if the bootloader has been copied correctly, by connecting a led to pin 1 of the 1284, and reset it by connecting the pin 9 to GND for a sec, like a push button, and you will see the LED flash couple of times!
If you have the 1284 non p model, then if you try to burn, you will get the following error
avrdude: Expected signature for ATMEGA1284p is 1E 97 05
Double check chip, or use -F to override this check.
And that’s cause Atmel assigned a different signature to each of them models, even though it’s the same chip, just that the p consumes less power, both use 5V.
1284-PU has signature bytes 0x1E 0x97 0x06
1284P-PU has signature bytes 0x1E 0x97 0x05
If you are using Windows, go to the following directory and open avrdude in notepad
\hardware\tools\avr\etc\avrdude.conf
If you are on Mac OS X, go to your applications, right click on Arduino icon and click on Show Package Content > Contents> Resources> Java> hardware>tools>avr>etc>avrdude.conf
Once you have avrdude opened in textedit program, find the following segment;

see where it says “signature = 0x1e 0x97 0x05;” change the 5 to 6 and save the file.
Restart the Arduino IDE and follow the steps mentioned for the 1284 to burn the bootloader, and you should not get any error. Once the bootloader is loaded, go back to avrdude, and change the 6 back to 5, if you don’t do this, you will not be able to upload sketches on to the 1284.
Uploading Sketches:
You can not upload sketches using the Arduino as ISP, it will not work. So you are going to need an FTDI converter, this is what I use to upload sketches, you could also use this or make one yourself!
Connect the FTDI as seen in the wiring diagram. Go to arduino IDE, select tools, programmer and select AVR ISP and open the blink example, change the LED pin to 1, and click upload. If you have an Led connected on pin 2 of the 1284, it will flash. Remember that the pin numbers do not follow the number of the chip, they are Arduino numbers. You can see that we connected the LED to D1 which is pin 2 on the 1284.
Atmel Samples:
If you go to Atmel’s website, and create an account using a company email or university email like .edu, you can request samples of their 8bit AVRs. You may only sample up to 3 units per model and they ship them pretty fast!
Thank you for reading, I hope you were able to get it to work, if you have any questions, don’t hesitate to post a comment and I will get back to you.
Cheers
Sep


What’s up to every body, it’s my first visit of this
weblog; this website carries amazing and really good information designed
for visitors.